Exams Next

  • Education
  • Tech
  • Telecom
  • Finance

How to schedule email messages in Gmail

by examsnext Leave a Comment

Time determines change, in the past year’s communication was the challenge. Fax, emails and letters were the in thing. However, time and technology defines the recent world. Communication is normal and almost everyone in the world owns a mobile phone. New media for communication like WhatsApp, IMO, Instagram color the communication sector. In this article we can see detailed view on How to schedule email messages in gmail.com

Amazingly email is the only media which doesn’t loss it’s taste. It has been there since time in memorial and going strong.  Gmail a product by the big giant Google happens to be a free email service. Users get the privilege to send and receive emails through third party programs. We have the IMAP and POP which help secure the messages by giving end to end encrypt. Gmail was officially established in the year 2004 and has developed gaining more users each day.

Schedule email messages in Gmail

Schedule email messages in the Gmail for sending later     

Gmail has eased the hassle of users allowing new products and features to the mail service. Gmail has come up with the schedule email to send later. This comes in handy as you can formulate an email and wait for the actual date. This also helps you send the mail when you are sure it will be read.

Though this a third-party product it works well with Gmail services. We have the Boomerang for Gmail or adding the Gmail to the outlook service. With this setting emails to be sent at particular time will be easy.

  1. Boomerang for Gmail

This an add-on to the Gmail features which allows you to send scheduled mails. It has three accounts some free and also the charged one namely premium accounts.

  • Go to your browser and download the browser extension from Boomerang.
  • After the download you can install the service.
  • Now login to your Gmail account.
  • Write the email address.
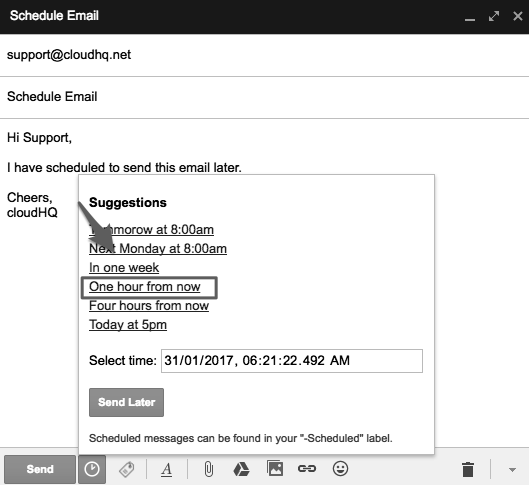
  • On the screen check for the “send later button” this appears slightly below the send button.
  • The system will send a pop up window.
  • Here select and set the time or day to delay then click on the confirm button.
  • The screen will indicate a small banner just at the top of the page. This shows when the message will be sent.

The message/email will automatically send when the set time comes. This eases work especially when sending bulk messages in organizations and companies. Boomerang comprises of many products and features making it a worth product to host.

Schedule Gmail to send emails later in outlook

Outlook and office 365 are set automatically to schedule emails according to the time set. They don’t have third-party programs thus give best services for it users.

  • Using your browser open your Gmail account.
  • Go to the setting section and select “forwarding and POP/IMAP”
  • Click on IMAP then save.
  • Now open outlook, after this choose files and account setting from the menu bar.
  • Picking account setting and the “new” option.
  • Proceed by filling all details and complete the account. enter your Gmail account where necessary.
  • The system might test automatically if not click on the test button.
  • An email will show on the screen on the new outlook inbox; it is created from the Gmail account.
  • Note the outlook system should work out the process automatically, however you can repeat the select account setting to help configure the email address.

Filed Under: Technology

How peer to peer network functions on home based lan

by examsnext Leave a Comment

Common terminology in the computing world, though having complex explanation. Peer to peer networking is where all computers share and have equal task and responsibilities for processing data. In peer to peer networking all devices work as client and servers at the same time. No separate connection like in client-server networking.We can say peer to peer networking devices are both consumers and suppliers.

One can make a hybrid connection at their home where they can connect two or more computer using a LAN port. The device can share either printers or CDs without a server. This makes a complete set of peer to peer networking and client –server network.

What are the different characteristics of peer to peer networks?

  • Peer to peer networking works well on small local area network (LAN). Especially on the home based LAN. It works on both the wireless and wired networks.
  • P2p networks share and work on the same networks protocol using the same software.
  • Since p2p networking happens in small business and homes, the devices are kept close to each.
  • Individuals using broadband routers are an example of hybrid peer to peer networking. They work as client server as they share same internet connection.

Why go for peer to peer networks?

Peer to peer networking has gain popularity, homes and business owners find it more convenient. All devices work equally without leaving any tasks pending. The sole purpose of peer to peer networking is to share resources computers collaborate and share data and other file giving equal task. They share files, data and internet which saves a lot on cost. They are all receive at once in all computer devices.

  • All computers have equal task and work together thus communicating with each other unlike the client-server networking.
  • The processing speed is high than when each computer is working individually.
  • Computers don’t depend on the input server to function.
  • It easier to use software application on peer to peer network.
  • The computers can share devices like printers, routers at the same time.
  • Data is distributed equally among all the computer devices.
  • Since there no centralized servers ne find no problems in the system. Example when using the client-server networking most information gets lost due to clogging up. Information from the clients cannot be handled by the server thus slowing down the system.
  • Internet shut down due to overfeeding of information is never a problem for peer to peer networking. The devices can share the received information without any hassles.
  • In home functioning peer to peer networking lack of centralized administration. Without the administration all files are arranged in one particular folder.
  • Peer to peer networking is effective comes in handy when on computer fails the rest still continue working.
  • The p2p networking is not expensive compared to individual networking.
  • Adding new peers to the existing peers is much easier, you don’t have to configure the server.

Basically the whole peer networking process is easy and doesn’t require any expert knowledge. Its best suited for small business and home based usage.

Filed Under: Technology, Telecom

How to change Jiofi Config Settings by login jiofi.local.html

by examsnext Leave a Comment

Jiofi is a hotspot gadget through Jio. Jiofi is powered by LYF. This is a small handy device that measures about 3cm by 2cm in size which makes it a relatively small device. Jiofi provides up to 32 devices network sharing (as on my jiofi2).

Jiofi provides fast internet connectivity powered by jio. Jiofi can also set up jio4gvoice provided your device is 2g, 3g or 5g. Many online shops selling this device are currently selling it at a discount. This makes it the best time of going for it.

What is the Main Use of Jiofi Dongle?
Jiofi allows mobile devices and multiple users to access 4G high-speed internet connectivity, and also create Wi-Fi hotspots on their devices. Here is a detailed list of how you can use Jiofi. In the below guidelines we will give the detailed information on How to Change Jiofi Settings either by Jiofi Admin login jiofi.local.html or 192.168.1.1

How to Change Broadcasting SSID and Jiofi Security Key by login jiofi.local.html

The following instructions gives the detailed guidance for you by login into jiofi.local.html website. Steps are as follows…

  • Click on the settings tab.
  • Click on “Wi-Fi” menu.
  • Under the Wi-Fi settings, you should see the default SSID name.
  • Change it to whatever you desire and reset your Jiofi device.

How to Access Storage Slot / SD Card Slot by Login 192.168.1.1

  • First, each user will have to insert the memory card in the Jiofi dongle device
  • Enable the storage account and set the username and password
  • Access the files you want by entering the URL http://jiofi.local.html/sdcard.html/
  • Click on the Wi-Fi button and use the SD card’s username and password
  • You can now access the storage slot. From here, you can upload your files and then copy them to your computer.

How to Make Voice / Video Calls Using Jiofi Device

So as to be able to make Jiofi video calls and voice calls using your Jio 4G Voice App. Every Jiofi user and Smartphone user first need to install the Jio 4G application on your phone. After successful installation of the app, connect your phone to the Jiofi device. Now that the app is already installed on your phone, open the 4G voice app.

The application will then prompt you to register or activate your mobile phone. Here, enter your Jiofi sim card number. You will receive a One-Time-Password (OTP) on your phone. Enter it to successfully verify the process. Afterward, the app will ask whether to access your contacts and messages. Click on Allow. After this step, your contacts will be synchronized with the Jio 4G app for voice. You can now use the calling feature via your Jiofi device.

How to Reset Jiofi Router?

There are many reasons why you would want to Reset your Jiofi Router to default factory settings. For instance, you might have forgotten your password. Follow this process to reset Jiofi router back to factory settings:

  • First, remove the back cover of the Jiofi device.
  • You should see the “Reset” text on the side of the “WPS” button.
  • Use a pin to press on the reset button for a few seconds (10-20).
  • You have successfully reset your Jiofi device to its factory settings.

Conclusion: The JioFI device always had issues with its firmware which must be resolved quickly. The JioFi firmware adds stability to the internet speed on the device. The device has no manual option to select or switch to LTE mode. The PEG_M2_B20 – version of the JioFi has a lot of issues with its firmware as users get less control over customization.

The ideal solution for the slow speed issue is moving JioFi device to a place where the signal for LTE band 40 is strong without any obstructions. Security is another concern for the JioFi users as the old firmware can be vulnerable to hacker’s attack. Hence it is important to upgrade firmware.

Filed Under: Technology, Telecom

« Previous Page

Recent Posts

  • Ceo Andhra Voter Search Mobile App Download of Ceoandhra.nic.in
  • HP LPG Gas Refill Booking Online Tracking status at myhpgas.in
  • UAN Login Password, Forgot UAN Password Reset at unifiedportal-mem.epfindia.gov.in
  • Foreign Direct Investment – Growth And the Quality: Is All FDI Equal?
  • Employee PF Balance and EPF Status using PF or UAN Number
  • Shareit for MAC OS Installation Procedure
  • Library Science Perfect Chance for a Perfect Career
  • Student’s Thirst On Australian Education
  • Engineering: Many ways Without an End
  • Objective Method also with Descriptive Orientation
  • CDSE – A Bright Way for Future
  • How to Transfer Files in AnyDesk Software
  • Banglarbhumi
  • Jiofi.local.html
  • Internet Banking Registration
  • CFMS
  • Epf India pf balance check without uan passbook.epfinda.gov.in
  • TTD Seva Online Tickets Booking at tirupatibalaji.ap.gov.in
  • pf balance check without uan number
  • Net Banking
  • Question Paper 2021
  • ExamsNext.com © 2012-18 | Privacy Policy | About Us | Contact Us